There are options for replacing kitchen fans that have died. But, how to install a kitchen exhaust fan properly? You can replace the motor even if your fan is old. A bathroom fan motor replacement is cheaper than a new one, and it saves you time and effort.
It doesn’t take much to reach the roof, cut into your ceiling, or crawl around your attic. It usually takes less than an hour.
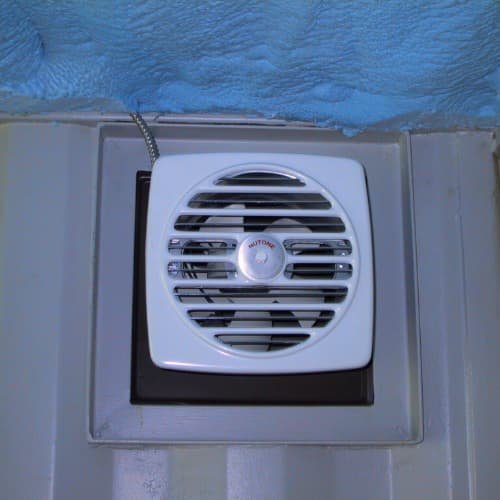
First, find the model number of your fan. Take off the fan grille (Photo 1), and vacuum the dust away. The number can be found on a label or stamped onto the fan’s housing.
However, you should not order a replacement motor until the old one is removed. Other parts may be required.
Overview of How to Install a Kitchen Exhaust Fan
 Although both fans come in a variety of designs, motor replacement is the same regardless of brand or model. Turn off the fan’s power at the main panel. Unplug the fan, then remove the motor plate (Photo 2). You can press or pry on the motor plate to release some motor plates. Some motor plates are secured by a couple of screws.
Before you can take the motor off the plate, you need to remove the shaft from the blower. This is often the most difficult part of the entire project. A screw might be used to fasten an older metal blower.
Plastic blowers are usually not fastened and slide off the shaft. Regardless of the reason, it may take some prying and pulling to get rid of the blower. Don’t panic if the blower is damaged during removal. A replacement motor can be ordered for a small fee. Simply reverse the removal procedure to install the new motor.
How to Prevent Roof Rot? Use Duct Outside
Cut out 4-1/4 inches. Place the marker screw in the centre of the circle of shingles. Next, drill a hole in the centre of the marker screw and then cut the roof sheathing.
Some installers use a shortcut when installing ducts above the bathroom. Instead of running it through the roof, they run the duct inside the attic. The fan then fills the attic up with moist air. This moisture feeds wood decay. Frost forms in winter, and water can cause damage to ceilings.
You should have a cap for your roof. If your bath fan vents into your attic, Although it isn’t difficult to run a new duct through your roof, you will need to work on the roof and in the attic. Consider replacing the fan since you are already doing all of that work.
It can be dangerously hot in the summer. Make sure to work in a cool place. Use a dust mask and protect your eyes. To make a platform for work, bring a torch and large pieces of plywood.
This is how you can do it in two trips to your attic. To locate the location from the outside, drive a screw through the roof. Next, head to a home centre.
Here Are the Things You Will Need:

-
- Roof vent cap
- The aluminium duct is the same size as the flexible duct. The length of the aluminium duct is only 6 inches. Therefore, you should buy the shortest possible section and then cut it with a metal cutter.
- Two 6-in. Hose clamps
- One tube of roofing cement
- 1-1/4-in. Roof nails and roofing nails are 1/2-in. Sheet metal screws
- The insulated duct is flexible. Insulation stops condensation from building up on the duct. Many home centres only carry 4-in. Insulated ducts. Your fan may have a 3-in. You can still use 4-in. Attach a 3-in. duct. Elbow and a 3-x4-in. Reducer with 1/2-in. Photo 5: Sheet metal screws
That’s all you need to know and get about how to install a kitchen exhaust fan.
CAUTION!
Although your roof might not seem intimidating from the ground, it will appear much higher and steeper once you climb up on it. Don’t attempt this project unless it is safe and secure. For good traction, wear soft-soled shoes. Make sure your roof is dry.
Keep clear of power lines. Buy roof jacks from a local home centre for increased safety. These brackets are made of metal and support a plank, which keeps you and your tools safe on the roof.
Rent a roof harness for the best safety gear. The harness attaches to a rope attached to the roof. However, if you want higher durability, we suggest you check out the best exhaust fan for kitchen in India.
This Project Requires the Use of Certain Tools

You’ll save time, frustration and money by having all the tools you need for your DIY project in one place.
- 4-in-1 screwdriver
- Adjustable wrench
- Caulk gun
- Set of drill bits
- Cordless drill/driver
- Pry bar
- Utility knife
Trouble is not a problem.
Note – Do you love sewing? Read Singer 7256 Sewing Machine Review and choose this suitable model for your needs.
This Project Requires the Following Materials

Don’t make last-minute purchases by having all the materials you need preparing ahead of time. Here is a list.
- 4-in. Flexible insulated duct
- 6-in. Hose clamps (2)
- Aluminium duct
- Roof cement (tube).
- Cap for roof vent
- Nails for roofing
- Sheet metal screws