Microsoft Teams is a great collaborative cloud platform. Though it was launched in 2017, it became popular during the pandemic. Since then its demand has only increased. However, for various reasons, people are searching a solution for how to move channel in Teams.
Why do MS Teams users think to migrate channels in Teams? Is there any proper method available to do so?
In this article, we’ll address the above queries and simultaneously provide a one-stop solution to effectively move channel data in Teams. So, let’s get started!
Know The Possible Reasons to Migrate MS Teams Channel
MS Teams is a reliable interface for operating day-to-day activities. But, there arise some scenarios due to which companies have to think about migrating channels. A few of them are:
- When companies witness growth in their business, usually they restructure their departments for better workload distribution. For instance, if the company decides to reform the accounts department & divide the workshare between HR and accounts. Then it becomes essential to move the channel from one Teams to another.
- Sometimes, to financially strengthen the businesses, organizations acquire or merge with other enterprises. In such a case, it becomes difficult to operate & maintain different channels. Hence, the solution is channel migration.
- In some situations, sections of an enterprise are to be split away, then there is a requirement of moving selected objects and data to a new target.
- Another reason would be re-branding. Here the existing channel has to be migrated to the new tenant to match the new brand name.
Deciding on moving channel content to a new target seems fine, however, the process is not that easy
Why Users are Searching for How to Move Channel in Teams– Understand the Challenge
The main and so far the biggest challenge is the storage allocation of MS Teams. Not like other products of Microsoft, Teams data is saved in multiple locations instead of one place.
And for that, the admins face difficulty because they have to pick up data from various places. And, if the data is large in size then it’s a real headache.
Besides, manually migrating the channel content is hopeless. That’s why they search for solutions on how to move channel in Teams.
However, the good news is technology here comes to the rescue. For instance, the Tried and Tested software Microsoft Teams Migration Tool has made the difficult task easiest for many IT admins.
So, let’s have a look at the benefits of using the tool.
How Can The Software Become Your Helping Hand to Migrate MS Teams Channel?
MS Teams is one of the important business platforms that many of you use to share sensitive files and documents. And, it is obvious to get concerned about the safety of the data.
Nevertheless, with the help of the software, you can experience peace of mind since it securely migrates channel data in Teams. At the same time, it maintains data integrity throughout the process.
And, if you require to move your data in bulk to the new target then it is not a problem for the tool.
Interestingly, after configuring the migration, it automatically creates Teams and Channels at the destination.
Also, you can easily migrate channels, channel message body, channel chats, etc. Further, this tool maintains folder structure until the end.
Moreover, by chance any of the items are left in the initial run, then the software facilitates a re-run migration option to solve your problem.
What else one can need for a smooth migration?
Also Read: Microsoft Teams Migration Project Plan to prepare the environment for channel migration.
So, without further ado, let’s discuss the working steps of the software.
How to Move Channel in Teams– Know The Detailed Procedure
Refer to the below process and find your channel data at the desired destination.
Step-1: Download the Teams migration tool from the given link and launch it on your desktop.
Step-2: Then, on the ‘Set up’ section, choose ‘Office 365’ as both the Source and Destination.
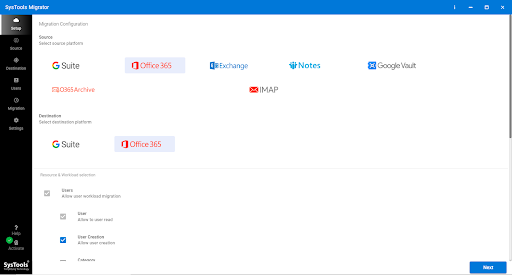
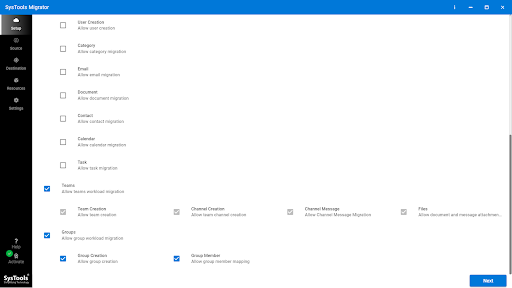
Step-3: After that, scroll down and click on the ‘Teams’ checkbox to migrate Teams workload.
[Optional: For migrating ‘Groups’, you can mark the checkbox next to it.]
Step-4: To migrate MS Teams channel, provide the correct source Admin Email and Application ID.
Then, click on the ‘validate’ button, verify all the source permissions, and hit ‘Next’

Step-5: Next, on the ‘Destination’ tab, provide the correct ‘Admin Email’ and ‘Application ID’ for the target.
After that, click on the ‘validate’ button, verify the destination permissions, and press ‘Next’

Step-6: Then, move to the ‘Resource’ tab. And, from the 3 sections i.e. ‘Users’, ‘Teams’, ‘Groups’, first, click on ‘Users’
Specify the source user(s) to move channel in Teams. To do so, select any one option from ‘Fetch User’, ‘Import User’, ‘Download Template’.

Step-7: After fetching the users, your screen will look like this. Then, you can choose the list of users you want to migrate.

Step-8: Then, to move channel in Teams, map the source and destination users.
Once again click on the ‘Validate’ button and verify both the source and destination permissions.

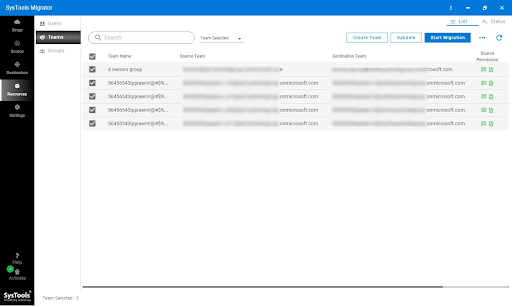
Step-9: Next, fetch teams in order to move channels in Teams.
In order to do so, follow the below instruction.
Go to the ‘Teams’>> choose any one option from ‘fetch teams’, ‘import teams’, ‘download template’.

Step-10: After fetching Teams from the Source, map the same with the destination Team to migrate MS Teams channel.
You can do that by clicking on ‘Create Team’ and giving destination names.

Step-11: Then, click on ‘validate’ and verify both source and destination permissions.
Step-12: Once the permissions turn green, press the Start Migration button. And, your query about how to move channel in Teams is solved.

Step-13: Also, you can execute ‘Re-run Migration’ i.e. you can retry failed items, re-run full migration, and migrate newly arrived items using Delta migration.
[Note: Make sure you don’t hit the ‘Mark Teams Complete’ option]

Step-14: Finally, click the Start Migration button and begin the migration of the selected workloads.

Conclusion
Some unavoidable situations that organizations have to go through which compel them to make a decision on moving their channel data to a new destination. But, somehow they don’t know how to move channels in Teams. So, we’ve come up with this write-up to solve your problem. Refer to the guide and start your Teams migration now!
Also Read: The latest post related to technology from here