Mortgage holders consistently settle on present-day refrigerators with worked-in water filters for their extraordinary comfort. These filters decrease tiny contaminations from your water, which brings about spotless and crisp drinking water(Refrigerator Water Filter).
Be that as it may, like other home machines, water filters decay over the long haul regardless of how careful you are with their upkeep. Consequently, it is essential to figure out how to clean a refrigerator water filter to broaden its life expectancy and guarantee that the filtration framework is without soil. Also, get a 30% discount using the Sears Parts Direct Coupon Code while purchasing the best quality refrigerator water filter.
The overall guideline of most refrigerator makers is to check and clean the more fantastic water filter-like clockwork. Look down this article and find out the fastest and most direct method for doing what is by all accounts an overwhelming errand for some.
What will you require to complete this tutorial?
Cleaning a water filter is practically equivalent to cleaning a refrigerator air filter. By and large, refrigerator water filters comprise three primary parts: repository/canister, container, and water lines.
At the point when I clean the Samsung cooler water filter, I, as a rule, set up these instruments and supplies to help me with cleaning the right parts with care:
1- Cleaning Solution
Petting Alcohol – is a universally handy delicate cleaner utilized basically on cleaning water filters. It is viewed as a strong cleaning specialist at home as it can eliminate many sorts of stains, imprints, and soil. You could utilize this with warm water.
I lean toward scouring liquor for flushing the filter due to its excellent sanitizer properties, which are fundamental to completely clean organisms out of the filter. In addition, it dries rapidly, and it is the least expensive accessible choice for mortgage holders like us.
Vinegar- White vinegar’s acidic corrosive is a cleansing dissolvable that destroys mineral reserves. As a result, vinegar is an excellent choice for cleaning refrigerator water lines that have developed dregs.
2- Bucket
This is one of the cleaning supplies we utilize consistently to contain water and other cleaning answers for family errands. You will put the can under the water container to gather the overabundance of soil and flotsam and jetsam blended in the water arrangement when you flush the refrigerator water line.
3- Clean Towel or Cloth
A towel should generally be ready to tidy up any water holes and development. You could put a towel on your refrigerator’s rack to get any water that might emerge while eliminating the water filter.
4- Adjustable Wrench
Some of you could utilize forceps, and it’s OK, the same length as they fill their need. In any case, I lean toward using a customizable wrench since it is, for the most part, used to slacken hexagonal nuts frequently found in refrigerator water lines.
Additionally, they fit various kinds of nuts and fittings. They have a more extensive jaw that makes it simpler to control the turning developments. Then again, forceps have edge and side cutters that are more alluring and supportive for cutting and holding.
5- Screwdriver
This is an entire apparatus. Without it, you can’t eliminate all of the screws connected to your refrigerator that give your water lines and water filter repository admittance.
6- Funnel and Clamp
You would require a pipe to pour the cleaning dissolvable inside the water lines release-free. The clasp will shut off the opposite finish to forestall spills.
Step-by-Step Instructions for Cleaning a Refrigerator Water Filter
The average future of a water filter is a half year. That is the most extreme time where you’ll see that the filter is dirty. In this way, a decent measure is to look at the filter like clockwork and know whether it needs cleaning or substitution.
Follow the ten definite stages to clean your more excellent water filter effectively :
Stage 1- Unplug the power line of your cooler. Then switch off the water valve, and ensure that it is shut. That is the overall guideline the vast majority of us know – shut down any power wellspring of any electrical apparatuses to avoid fire mishaps.
You can generally track down the water valve behind your refrigerator. If you can’t track down it, go to the fundamental shut-off valve cellar and turn it off.
Stage 2- Grab your screwdriver and separate the water lines. Clean the refrigerator water distributor line and the ice producer line, assuming you have one. Unscrew them both, and it depends on how much cleaning you need to spend on the two lines.
Pro Tip: Place a cloth or paper towel to assimilate water depleting from the water supply tubes. Assuming you have any spilling issues with your ongoing ice creator line, consistently recall that the standard size for copper tubing and pressure fittings is ¼ O.D.
Stage 3- Insert the channel in the suction port of the water lines. Utilize the brace to close the opposite stopping point to keep away from spillage.
Set up the cleaner (vinegar and water combination). Fill the channel to the edge with this arrangement. Then, at that point, clean the refrigerator water line by letting your water lines drench for around 10 minutes.
Pro Tip: Use no less than three cups of vinegar with warm water.
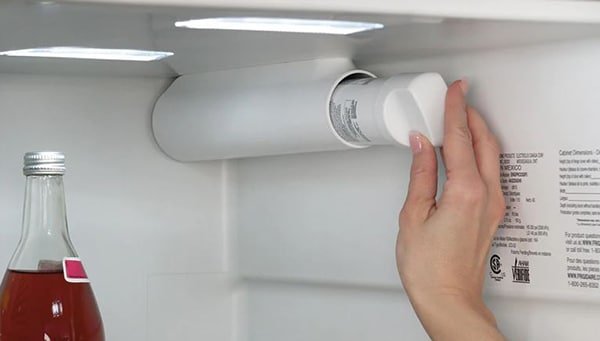
Stage 4- While sitting tight for the water lines, eliminate the supply. You can see this behind the crisper cabinet or in the opening barbecue at the lower part of the refrigerator.
A few more seasoned models of repositories are situated outside on the water supply line behind the refrigerator. The filter is most frequently around tubes around 3-4 inches wide.
You can allude to the client manual as an aide if you don’t see it. When you find the supply, handle the top and bend it counterclockwise to separate.
Pro Tip: If you lose the manual, you can look into the model number of your refrigerator on the web. It will be preferable over moving the unit out of its place looking for a specific area.
Stage 5- Proceed with cleaning the repository. Benevolently unfilled the water inside and unclog an ice chest water filter. Dispose of the more considerable debris and jetsam developed by tapping the storage over a garbage bin or pack.
Absorb the filter the same way you did with the water lines from that point onward. Lower the filter in vinegar blended in with warm water to wipe out the dregs. Yet, matching it up with scouring liquor as a sanitizer will thoroughly disinfect the filter.
Pro Tip: You can make a cleaning arrangement of 1 cup of vinegar for every gallon of water and add a liberal measure of scouring liquor.
Most refrigerator water filters have enacted carbon as a filtration medium. To completely clean this sort of filter, I energetically suggest allowing it to sit with the answer for five days to eliminate every one of the toxins through and through.
Stage 6- Back to the water lines and channel the lines with clean water. Like how you ran the cleaner through before, keep the opposite end open to oust the water out and discharge the leftover chemical.
Stage 7- Do something similar with the supply. Run clean water through it to eliminate any extra arrangements. Assuming the water used to wash off the parts comes out dull and scentless, it’s a decent sign that it is cleared out to stay purging.
Pro Tip: Use no less than 8-10 glasses of water.
Stage 8- Reattach the supply and the water lines to their spots.
Stage 9- Turn on the water valve. Ensure that the water goes through the entire filtration framework. Utilize a soggy towel and wipe off the container’s spout to eliminate any calcification. Finally, let the water run from the water gadget to the pail until complete.
Stage 10- Get the ice producer box and wash it with a similar cleaning agent (warm water and vinegar). Try to discard the central clump of the ice made. Allow it to dry before returning it to the ice chest.